


FEATURES
- Breakout Card Type 1 Screw Mount 26-18 AWG for Raspberry Pi
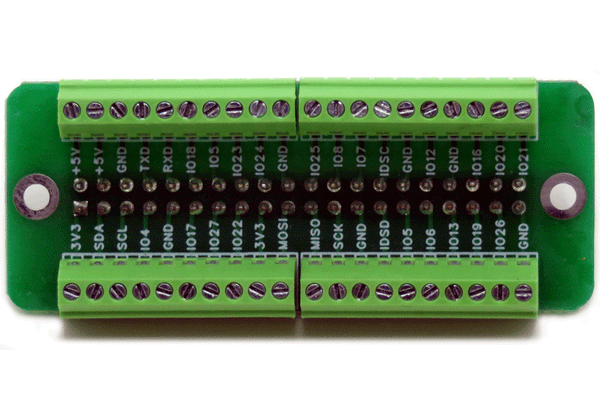
- Routes all 40 I/O and power pins to screw terminal blocks
- Permits easy and secure field installation
- 2.54mm Pitch PCB screw Terminal Block Connectors
- Rated voltage: 300V
- Rated current: 10A
- Wire range: 24 - 18 AWG
- Breakout Card for Raspberry Pi
DESCRIPTION
Screw Mount Breakout Card for Raspberry Pi
The 2x20 pin header can be plugged into Raspberry Pi or into any stackable expansion card. It brings all 40 pins to screw-mount terminal blocks for conveniently wiring your project. Measuring only 104mm x 52mm, the card adds a prototype area with 5 x 40 PCB holes spaced at 0.1" apart where you can install your through hole parts for your own custom project. The terminal blocks accept 26 to 18 AWG wires and are rated 6A/150V.
The 2x20 pin header can be plugged into Raspberry Pi or into any stackable expansion card. It brings all 40 pins to screw-mount terminal blocks for conveniently wiring your project. Measuring only 104mm x 52mm, the card adds a prototype area with 5 x 40 PCB holes spaced at 0.1" apart where you can install your through hole parts for your own custom project. The terminal blocks accept 26 to 18 AWG wires and are rated 6A/150V.
LAYOUT

OTHER BREAKOUT CARDS
We have three breakout cards for Raspberry Pi, to satisfy all your prototyping needs. All cards plug into the Raspberry Pi 40 pin GPIO connector and bring the IO's to different terminal blocks.
This card uses spring loaded terminal blocks, which permit rapid connection to I/O pins without any tools. The card has a prototype area of 7 x 19 holes at 0.1" spacing which can be used to test your own hardware. The terminal blocks accept 22-18 AWG wires and are rated 5A-300V.
This card connects the GPIO pins to heavy-duty pluggable terminal blocks. It can use used both for Raspberry Pi and for the Home Automation Cards. The 2×20 pin header can be plugged into Raspberry Pi or into any stackable expansion card or HAT. The terminal blocks accept 24 to 14 AWG wires and are rated 8A/300V.